Pimlical Android Help
Setting up a Remote Server (Subscription Feature)
New
in V-4.2 is the ability to setup Remote Servers which allows Pimlical
to access a USB storage device (such as a USB hard drive or USB key)
attached to a router, or to any web page that the user has access/login
rights to.
For each Remote Server, there are six attributes which need to be set up in the Preference: RemoteServerList.
Each attribute is separated with a comma from the other attributes.
There is no limit on the number of remote servers that you can setup.
Tag
This is the user-friendly name that you will use to specify
which remote server you want to use in AutoSync, Backup Everything or
the Internal File Manager.
Protocol This attribute is either FTP or FTPS to
indicate which protocol will be used to access the Remote Server.
Routers typically use FTP, whilst Web pages typically use FTPS. FTPS is
more secure, so always endeavor to use FTPS if both protocols are
supported.
IP/Domain
This attribute is the address of the Remote Server. Typically you
will use an IP address to access the router (normally 192.168.0.1) and
a domain name to access a web domain (such as PimlicoSoftware.com).
Path This
attribute specifies the file path to the root of where files are
stored. In the case of a router, you will usually find a folder name
here (sda1 on a Tenda router, G
on a TP-link router etc.), or if there is no folder name, just the
forward slash (/). In any event, the Path attribute must end with a
forward slash.
Username This attribute is the user name of the Remote Server (default in the case of a router is admin) and in the case of a web domain is whatever user name you use to log in to the website.
Password This
attribute is the password that you in conjunction with the above
username to log into the Router or web domain. Note that in the
preference, the password is always scrambled - it is only unscrambled
when you bring up the preference RemoteServerList, select a particular Remote Server and tap the Edit button.
When you view the RemoteServerList
preference directly in the Default.txt preference file, you will see
that all Remote Server attributes appear as a long, single string,
which uses the vertical bar ( | ) character to separate off each
Remote Server Attribute list. A typical display of the RemoteServerList preference in Menu | Preferences would be something like:
Router, FTP, 192.168.0.1, /sda1/, admin, &frzmt;3p^j*
Pimlico, FTPS, pimlicosoftware.com, /, Candelabra$,fpQEkvZ*s(qv
There is also a preference RemoteServerTimeout that
specifies how long the timeout is before Pimlical concludes the FTP
server is off-line. The default value is 3s, but if you see you are
gettting frequent timeouts, by all means increase this value to say
30s. It's a good idea not to make it too long, as if you are using the
Internal File Manager when Pimlical goes to access the Remote Server it
will have to wait for the timeout to determine that the server is
off-line which would give Pimlical the appearance of hanging.
You
can change the order of servers in this preference by selecting a
specific server and tapping the OK button (at that point, the selected
server is moved to the top of the list). Note that both AutoSync and
BackupEverything can explicitly reference a particular Remote Server,
whilst with the Internal File Manager you can long-press the File
Manager icon to get a list of all Remote Servers and select one for use
in the Internal File Manager.
Setting up a Router as a Remote Server
A
simple way of setting up a Remote Server is to connect an external USB
hard drive or USB key to your network router.
Most contemporary routers have a USB port to which you can connect a
USB device. If you log into the network router (usually on the
address: 192.168.0.1), you should be able to configure access to this
hard drive. You can access the drive either via FTP or the more secure
FTPS (if you have not set up a user name and login for your router,
this is definitely the time to
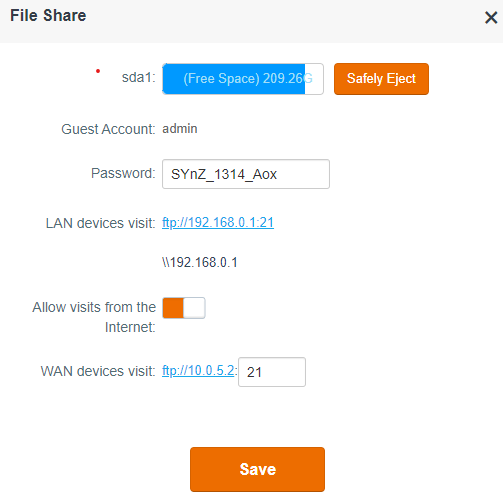
take that necessary step to improve security!). The screenshot below
shows a typical setup screen for sharing the drive on the USB port
(This is for a Tenda router - your router will likely have a similar
setup screen):

In this case, your drive can be accessed through ftp://192.168.0.1.
This router does not support FTPS, so you need to setup the FTP as the
Protocol attribute in the RemoteServerList Preference in both P/A
and P/D. The login attributes for the remote server entry would be set
to admin,SYnZ_1314_Aox - i.e. admin is the user name ("Guest Account" here) and SYnZ_1314_Aox is the password that you assigned to log into the router. For the tag, pick any name to identify it such as Router.
The IP/Domain and Path attributes (in both P/A and P/D) would be set to 192.168.0.1 and /sda1/ -
that is the IP address of your router on the local network (most likely
the same as this), a comma, and then the path to the hard drive. In
this case, it's /sda1/ - note that the path starts with a forward slash
and ends with a forward slash. There might be no foldername - in that
case just use a single forward slash after the comma. It is imperative
to have something have something after the comma as if it is left blank, Pimlical will not access the remote server at all.
When setting up a drive for the first time, it's
probably also a good idea to have an Android File Manager that handles
FTP (like File Manager+ ) so you can review files on the hard drive
and verify that files are being written as expected to the appropriate directory. When specifying any paths, remember that
paths will always use the forward slash for that drive. It's just a bit
of an historic anomaly that Windows uses the backslash for paths on
local drives.
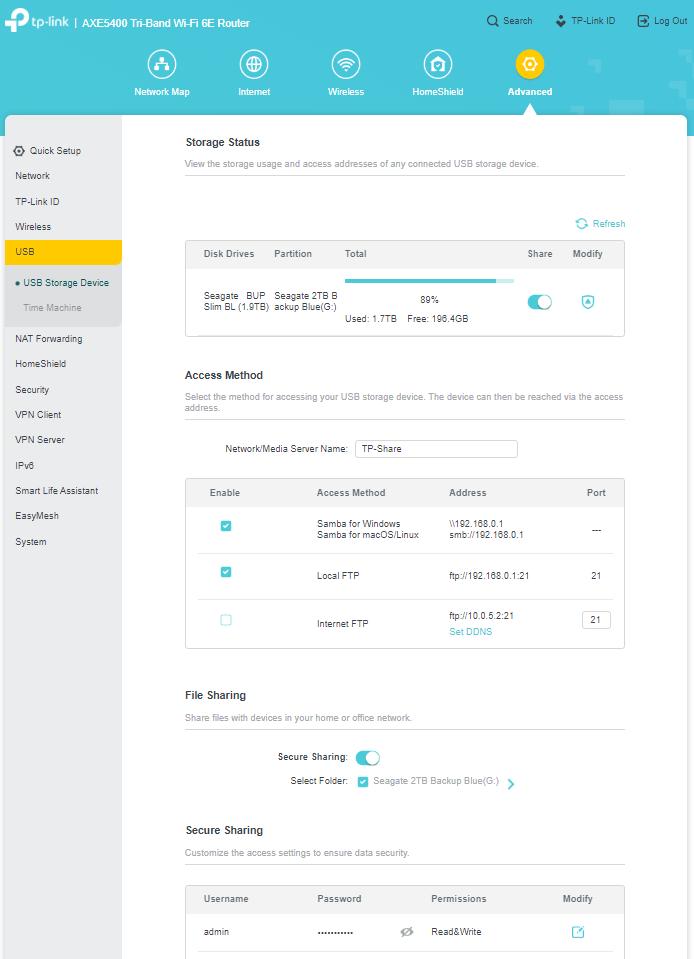
For comparison with the above, here is the information from a TP-Link router - in this case, the Advanced
tab that is displayed after you put 192.168.0.1 into the address field
of a web browser has the information about the attached USB storage
device:
In this case, the IP address of the router is also 192.168.0.1 and the user name is also admin.
Setting up a Router in Windows
You
can also setup your router drive in Windows - and that provides another
method of verifying what the path is to the Router. Follows these steps
(this is for Windows-11-Pro - other versions of windows might have
different screens):
1. Right click This PC in Windows File Manager, and select Add a Network Location.
2. Dialog appears with Welcome to the Add Network Location Wizard, click [Next] button.
3. Dialog appears with Where to you want to create this Network Location? Click on Choose a Custom Network Location and then click the [Next] button.
4. Dialog appears with Specify the Location of your Website, enter ftp://192.168.0.1 - or whatever the IP address is that your Router is setup on), and click the [Next] button.
5. Dialog appears with Specify a User Name and Password if Required, leave default settings and click [Next] button.
6. Dialog appears with What do you want to name this location? Enter any name like RouterDrive to replace the 192.168.0.1, and click [Next] button.
7. Dialog appears with Completing the Add Network Location Wizard, click the [Finish] button.
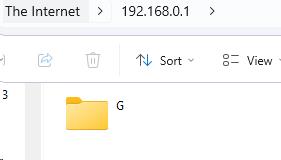
8. Look under This PC in Windows File Manager and you should see an entry for RouterDrive
(or whatever name you used in step 6) - you should see the RouterDrive
open and the windows will display an icon for a file folder and to the
right of it the path to the router. This might just be a single letter
like G as shown below:
In
this case, the path would be: /G/ - i.e. whatever name is displayed
there, use that and put forward slashes at the beginning and end to use
as the path in the RemoteServerList preference as the path to the router.
Setting up a Web Domain as a Remote Server
This
same mechanism can be used to access a web-based server that you have
access/login rights to. Obviously you can only access a web domain that
you own or one that the owner has explicitly granted full access rights
to you for.
In that case, you would most likely want to use FTPS as the
protocol (it's unlikely a web-page would permit insecure FTP type
access). You would then setup the six attributes for the enty in the RemoteServerList preference with the domain name of the website (such as PimlicoSoftware.com)
- which would use the web page: www.PimlicoSoftware.com. Typically
there will be no path, so just use a single forward slash ( / ) for the
path. Note that if you set up several sub-folders on the domain, you
can, if you wish, have several Remote Servers set up in RemoteServerList that directly access sub-folders on the same domain.
Setting
up a web-based server if often a lot more complicated due to
idiosyncrasies of various web-hosting sites, local firewalls, etc. so
be sure to set aside quite a bit of time for this! Again, it is highly
recommended that you first set up your domain for access via File Manager+ and Windows File Manager and get that all working properly before attempting access through Pimlical.
Access
to files on Web pages over the internet will be slower than accessing
files from the router, so you might want to increase the value of the
preference: RemoteServerTimeout.


