
Pimlical/Desktop Installation
Installing Pimlical/Desktop
The
link to the current official release of Pimlical/Desktop can always be
found at the bottom of this web Page:
https://www.PimlicoSoftware.com/PayPalSubscription.html
The
procedure below covers the normal installation of Pimlical/Desktop.
Pimlical is a pure java application which will run on Windows, MacOS
and most (if not all) Linux distros.
1.
Make sure you have Version 8 of Java installed. Earlier or later
versions of Java will not work properly. You can download Java from
www.java.com. Most users will want to download the 64-bit version of
Java and the installer will automatically install the 64-bit version of
PImlical to use with it. However, it is quite all right to use the
32-bit version of Java, in which case the installer will install the
32-bit version of Pimlical/Desktop. Warning: if you have both 32-bit
and 64-bit versions of Java installed, there can be an issue in that if
the 32-bit version of Java is running and you try and launch the 64-bit
version, all you will get is the splash screen (cartoon of two friendly
gorillas at their computers) and nothing else because onlyl the 32-bit
version of Java can launch the 32-bit version of Pimlical (and likewise
for the 64-bit versions).
2. Reboot your Desktop PC (in theory, not necessary, but it really is a good idea to do this).
3. Download the current release of Pimlical/Desktop from the link at the bottom of this web page: https://www.PimlicoSoftware.com/PayPalSubscription.html.
4.
Locate the installer file which will have a name like:
PimlicalJavaInstall4209.jar and double click on the JAR file. This
should start the installer. If the installer does not run, Java is not
installed properly - remove Java and reinstall - see the FAQ's:
https://www.pimlicosoftware.com/pimlicalfaq.html for information on how to get a clean installation of Java.
5. Make certain that Pimlical is not currently running!
If Pimlical is running, it will look like the installation succeeded,
but in fact the old version of Pimlical is left. If the installer
launches properly, you should now see the first installer screen:
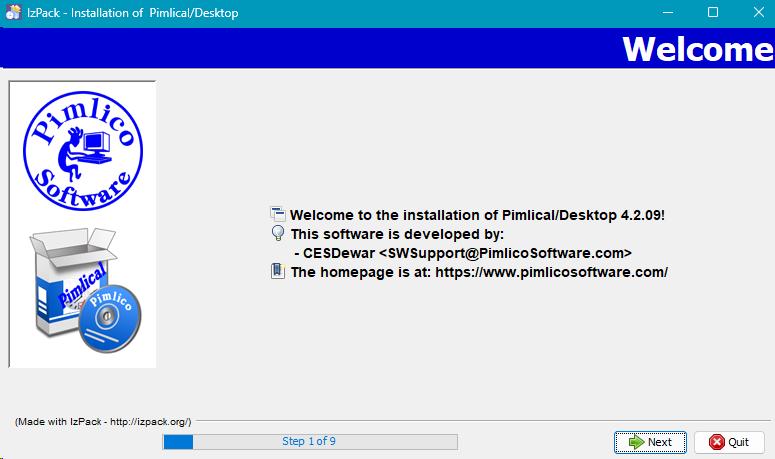
6. Tap the [->Next]
button at each step. Note that you have to accept the license agreement
to proceed. All the screens should be self-explanatory to any user that
has installed applications. At the conclusion, the installation will
create a new Pimlical folder by default under
C:\Users{YourWindowsName}\AppData\Roaming\Pimlico) and also supply a
desktop icon to actually launch the application itself.
7. Launch Pimlical and you will see the initial install dialog that looks like this (you will see your Windows User Name instead of 'cesde' as shown in the image below).
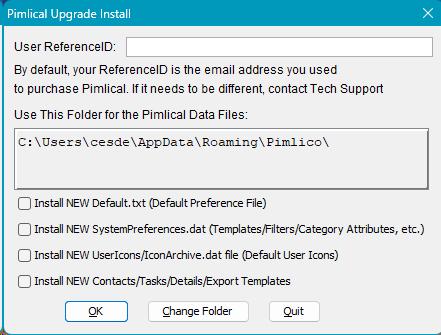
8. Enter your ReferenceID in the User ReferenceID
field. Your User ReferenceID is normally the Email address that you
used to purchase Pimlical/Desktop. However, if you are also using
Pimlical/Android, you should set this to the ReferenceID that you used
for Pimlical/Android. The four checkboxes will normally all be grayed
out and selected as on an initial install, all of these items will be
installed. The ReferenceID you enter here will also be the value of the
preference: RegisteredUserName.
9. If you want to put the Pimlical User folder in another location, tap the Change Folder
button and navigate to the new location where you want the folder to be
located. It is recommended that you not do that unless you know
precisely what you are doing and are willing to fiddle around a bit to
get the path set correctly!
10. Tap the [OK] button to finish the installation and launch Pimlical.
11.
If all you see on launching Pimlical is the splash screen - a
cartoon of two friendly gorillas at their computers - and nothing else,
Java is not installed properly - in that case, you may want to perform
a completely clean installation of Pimlical - see below.
Reinstalling Pimlical/Desktop
On
occasion you may want to perform a completely clean installation of
Pimlical/Desktop in order to determine whether some portion of the
install is corrupt and to correct it.
Not every step below will
be necessary, but rather than trying things over and over again, it's
often better to just follow one single procedure that is guaranteed to
get everything working again.
1. Remove the
Pimlical App using Windows Control Program | Programs & Features.
If you don't see it there, navigate to C:\Program
Files\PimlicalApp\Uninstaller\PimlicalUninstall.jar (or Program Files
(x86) if using 32-bit java/PD) and double-click on the JAR file to
launch the uninstaller.
2. Then Remove Java
using Windows Control Program | Programs & Features. Make sure you
remove ALL versions of Java there – you might well have two or more old
installs of Java lying around, and they can cause problems (see note at
the end of this procedure to make sure you remove ALL traces of Java,
before reinstalling it.
3. Reboot your Desktop PC.
4. Download and install the latest update of Java (new updates are posted very regularly).
5.
If you had already previously installed Pimlical/Desktop, rename the
Pimlico folder under C:\Users.... (usually
C:\Users{YourWindowsName}\AppData\Roaming\Pimlico) to some other name,
say PimlicoSave. If you had an old Palm Install, this might be under
C:\Users{YourWindowsName}\Documents\Palm OS Desktop..... I would also
make a copy of this folder (and all sub-folders) and put it somewhere
completely safe and separate from your desktop.
At this point, I
would scan your entire C:\ drive to make sure you don't have MULTIPLE
copies or left over 'shards' of Pimlical from prior, failed installs:
so scan the drive for:
*pimlic*
That will find all files
and folders with the name pimlico, Pimlical etc. MAKE SURE YOU SKIP
PimlicoSave (!!) but anything OUTSIDE of that folder with 'pimlic' as
part of the filename can be safely deleted as unless you have something
odd going on, there should be no other files/folders containing that
string of characters.
6. Reinstall the current
official release of Pimlical (see http://www.PimlicoSoftware.com to
confirm you have the latest release). The installation will create a
new Pimlical folder under
C:\Users{YourWindowsName}\AppData\Roaming\Pimlico).
6b.
It’s probably a good idea at this point to launch Pimlical and make
sure it launches without error, displaying a completely empty calendar.
You can then quit Pimlical and continue with the restoration of your
calendar data
7. If you see these three
folders below in the renamed Pimlical folder, copy them from the
renamed Pimlical folder to the NEW Pimlical folder:
PimlicalCalendars
PimlicalContacts
PimlicalMemos
8.
Launch Pimlical and verify that you can see your data ... and that no
problems occur as you were seeing previously.
9.
Next Step is to restore your preferences, keeping in mind that MIGHT be
what was causing the problem previously, so exit Pimlical and then:
10.
First, try restoring your System preferences by copying
SystemPreferences.dat from renamed Pimlical folder to new Pimlical
folder and relaunch Pimlical and make sure it’s all ok.
11.
If still ok, exit Pimlical and then try restoring your USER preferences
by copying Default.dat and Default.txt from the renamed Pimlical folder
to the new Pimlical folder.
If that all works, you are set, but
if in step 10 or 11, problems return, uninstall Pimlical and reinstall
and then check the box to Install the default System or User
preferences (whichever was causing the problem).
Note: if
problems STILL persist, go back to step 1 again, and after Step 2, to
get a completely CLEAN installation of Java, try removing Java using
the Java Removal Tool which you can download from
http://www.majorgeeks.com/files/details/javara.html. If that still
fails, try JarFix which you can download from
http://johann.loefflmann.net/downloads/jarfix.exe. Also, after removing
Java, you might look in C:\Program Files and C:\Program Files (x86) and
delete ANY folders that have the name 'Java'. Then proceed with step 3.
Uninstalling Pimlical/Desktop
The installer will normally create an uninstaller folder with the name Uninstaller
under the PimlicalApp program installation folder (which itself will be
in the normal area for Program Files - for windows, this would be
C:\Program Files for 64-bit apps and C:\Program Files (x86) for 32-bit
apps). In that folder should be a file with the name: PimlicalUninstall.jar - double click on that file and the uninstaller should run. You may also need to go into (Windows - Search bar) Add Or Remove Programs, locate Pimlical if it still shows as installed and remove it from there.
Finally,
to ensure there are no "shards" left over from the uninstall, you can
scan the root folder and all sub-folders for this String:
pimlic
as
that should find everything with the name 'Pimlico' or 'Pimlical' and
all such items can now be deleted (you may need to put asterisks on
either side as a wild-card: *pimlic*).
Last Revised:28Feb2025